This example uses plain old javascript to access the Air-port-codes API, however you can utilize the ever-so-popular jQuery library to help you display the content in a meaningful way. No jQuery or other frameworks are required to use our Air-port-codes library.
The basics
Here are the necessary parts to getting things working. First load our apc library that you downloaded earlier. Then initialize the api library, letting it know what api you want to access ('multi' or 'single'). Initialize the apc object with your api key and any other necessary parameters. Setup your callbacks (onSuccess, onError). After that, you are ready to make your request with your search parameter.
- <script src="air-port-codes-api-min.js"></script>
- <script>
- // initialize the apc library
- var apcm = new apc('multi', {key : 'xxxxxxxxxx', limit: 7});
-
- // handle successful response
- apcm.onSuccess = function (data) {
- console.log(data);
- };
-
- // handle response error
- apcm.onError = function (data) {
- console.log(data.message);
- };
-
- // makes the request to get the airport data
- apcm.request('new yo');
- </script>
Those are all of the necessary things to get some results back from the API using plain old javascript. For a real world scenario keep reading and/or download our sample code.
A real world scenario
Build a form that will allow your visitors to search airport information. Start by creating a form with an input field and a submit button.
- <form id="multi-form">
- <input type="text" name="term" id="term" placeholder="Airport search" />
- <button type="submit">Multi Search</button>
- </form>
Now for the javascript. First, add the javascript library that you downloaded. Then initialize the api library, passing in any request parameters that you may need, including your api key.
The request function (apcm.request(term)) is what you will use to make the api request, where you will pass the search term as the only variable. You can use the apc library's callback functions (onSuccess and onError) to handle the response.
- <script src="air-port-codes-api-min.js"></script>
- <script>
- // get your api key from your air-port-codes account
- var apiKey = 'xxxxxxxxxx';
-
- // initialize the apc library
- var apcm = new apc('multi', {key : apiKey, limit: 7});
-
- // handle successful response
- apcm.onSuccess = function (data) {
- // do something exciting with the data
- console.log(data);
- };
-
- // handle response error
- apcm.onError = function (data) {
- // show an error message with data.message
- console.log(data.message);
- };
-
- // handle submitting of the form
- document.querySelector("#multi-form").addEventListener("submit", function(e){
- e.preventDefault(); //stop form from submitting
- var term = document.getElementById('term').value;
- apcm.request(term); // makes the request to get the airport data
- });
-
- // or the jQuery method
- $('#multi-form').submit(function (e) {
- e.preventDefault(); //stop form from submitting
- var term = $('#term').val();
- apcm.request(term); // makes the request to get the airport data
- });
- </script>
We add a listener so we know when the form is submitted and make the request using the value of the input field as our request parameter.
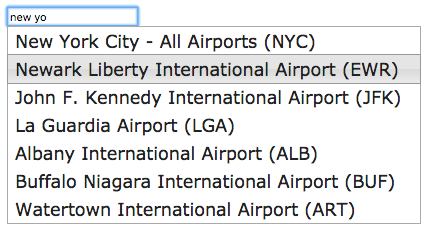
jQueryUI has an easy to use autocomplete tool that is great for allowing you to add autocomplete functionality to any text field on your website. In fact, it is the tool we are using in the header bar on this website.
Here is how we recommend using it. First load the jQuery and jQueryUI libraries as well as our Air-port-codes library
- <link rel="stylesheet" href="https://ajax.googleapis.com/ajax/libs/jqueryui/1.11.4/themes/smoothness/jquery-ui.css">
-
- <script src="//ajax.googleapis.com/ajax/libs/jquery/1/jquery.min.js" type="text/javascript"></script>
- <script src="https://ajax.googleapis.com/ajax/libs/jqueryui/1.11.4/jquery-ui.min.js" type="text/javascript"></script>
- <script src="air-port-codes-api-min.js"></script>
Now that everything is loaded, you can build a simple form with a textfield in it.
- <form id="multi-form">
- <input type="text" name="term" id="term" placeholder="City name or airport code" />
- </form>
We can then initialize our apc object and setup our auto complete object that we pass in to jqueryUI's autocomplete plugin.
- <script>
- $(function() {
- var apcm = new apc('multi', {key : 'xxxxxxxxxx', limit: 7});
-
- var autocompleteObj = {
- source: function( request, response ) {
- // make the request
- apcm.request( $('#term').val() );
-
- apcm.onSuccess = function (data) {
- if (data.status) { // success
- response( $.map( data.airports, function( item ) {
- return {
- label: item.name + ' (' + item.iata + ')',
- value: item.name + ' (' + item.iata + ')',
- code: item.iata
- }
- }));
- } else { // no results
- response();
- }
- };
- apcm.onError = function (data) {
- console.log(data.message);
- };
- },
- select: function( event, ui ) {
- // do something for click event
- console.log(ui.item.code);
- }
- }
-
- $( "#term" ).autocomplete(autocompleteObj);
- });
- </script>
If you use our PHP library, included in the download above, then it will be very easy to get a response back the Air-port-codes API. All of the curl functionality will be handled for you.
You start by including the apc class.
- require_once('air-port-codes-api.php');
Next you create an array of parameters that will be used in your request to the API. Then pass in the parameters when you instantiate the apc class.
- // Setup request parameters to override the configparams set in apc class
- $params = [
- 'key' => 'xxxxxxxxxx', // this is required and can be found in your Air-port-codes account.
- 'limit' => 2,
- 'size' => 3,
- // 'secret' => 'xxxxxxxxxxxxxxx' // the secret key, necessary for requests that don't provide a referrer
- ];
-
- // 'multi' or 'single' type of request
- $apc = new apc('multi', $params);
The final step is simply making the request. Just pass in the search term and your curl request will be automatically made to the Air-port-codes API.
- $apcResponseObj = $apc->request('new yor');
You can now display the results however you want. The returned object will be a json decoded object.
- <pre>
- <?= print_r($apcResponseObj); ?>
- </pre>
 Air-Port-Codes